Sokoban is yet another classic casual game genre. You control a warehouse worker who must organize boxes by pushing them to certain locations. The difficulty is to not get a box stuck by pushing it against the wall or into a corner. As a kid, I played games with similar mechanics, such as Rodent’s Revenge. These sorts of games are easily made with Waffle, as they limit movement to within a grid. Let’s go ahead and figure out how to make a basic sokoban game.
As always, download the Waffle source, which has a game.js template file with some example code. You can then open the index.html file (File → Open File → index.html) in a browser and have the game run instantly.
The template is set up to initialize a 10x10 grid. This is a reasonable size for a basic sokoban level, so we’ll keep those dimensions. The first step in making the game will be to draw walls in the level. You should know the drill by now — any string you store in the grid will be used as a CSS class in the resulting HTML. So any image you want to represent a game object should have a rule in the main.css file. We’re gonna start the game by drawing level walls, so remove the highlight class, and add wall.
#grid {
  /* omitted for brevity */

-   .highlight {
-     background-color: blueviolet;
-   }
+   .wall {
+     background: url('images/wall.png') center/100%;
+   }
}
We’ll eventually need images to represent walls, boxes, targets, and the player. Make your own if you want, otherwise you can download some.
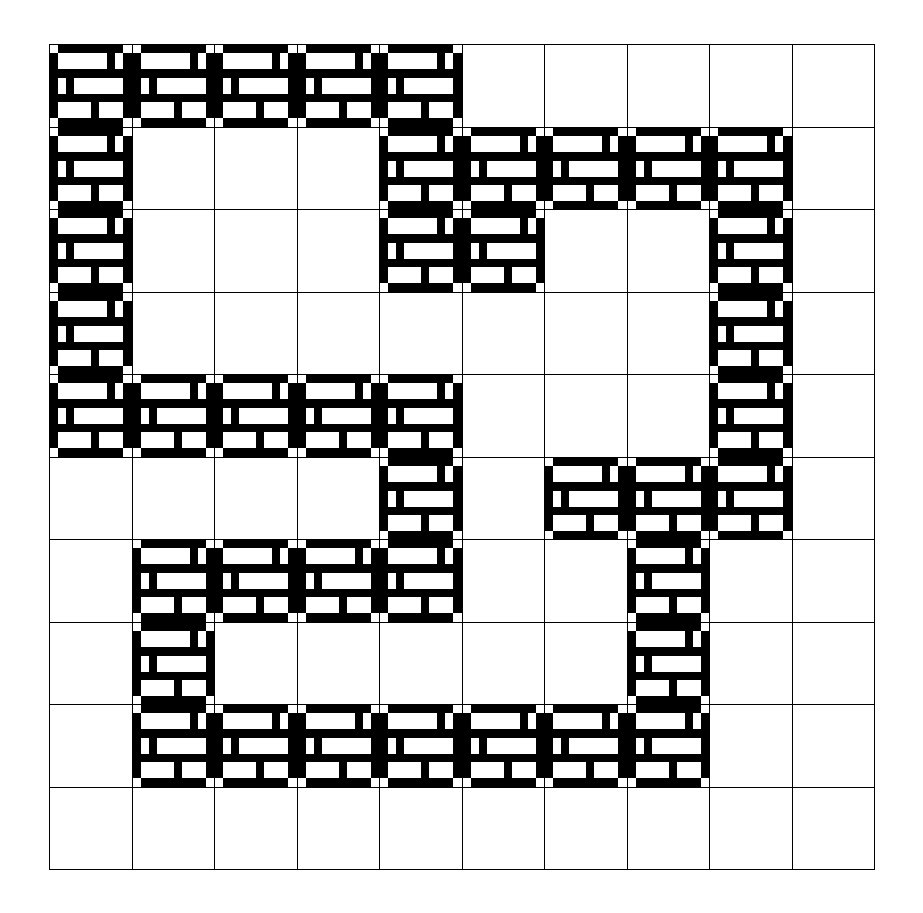
Now we have to figure out what we want the level to look like. I guess normally you’d have some sort of fancy data structure for storing levels, but here we’re gonna just use a 2D array. One benefit of this is being able to edit the level directly in your source file. In this array, a space will be an empty area, and a # will be a wall. After the call to Waffle.init, add the level data.
Waffle.init(rows, columns);

+ const level = [
+   ['#','#','#','#','#',' ',' ',' ',' ',' '],
+   ['#',' ',' ',' ','#',' ','#','#','#',' '],
+   ['#',' ',' ',' ','#',' ','#',' ','#',' '],
+   ['#',' ',' ',' ','#',' ','#',' ','#',' '],
+   ['#','#','#',' ','#','#','#',' ','#',' '],
+   [' ','#','#',' ',' ',' ',' ',' ','#',' '],
+   [' ','#',' ',' ',' ','#',' ',' ','#',' '],
+   [' ','#',' ',' ',' ','#','#','#','#',' '],
+   [' ','#','#','#','#','#',' ',' ',' ',' '],
+   [' ',' ',' ',' ',' ',' ',' ',' ',' ',' '],
+ ];
Now we need to take that data and display it in the game, by injecting it into Waffle’s grid. We’re converting the # symbol into the string 'wall', just so that it’s easier to see how the level will look when each grid cell is a single character. To do that we’ll loop over each (x, y) position of the level data, and set the corresponding value in Waffle’s state. After the level variable, add the following:
  [' ',' ',' ',' ',' ',' ',' ',' ',' ',' '],
];
+
+ const nextState = Waffle.state;
+
+ for (let x = 0; x < Waffle.columns; x += 1) {
+   for (let y = 0; y < Waffle.rows; y += 1) {
+     const cell = level[x][y];
+
+     // evaluate the simplifed text contents of the
+     // level data and set the state of the grid
+     switch (cell) {
+       case '#':
+         nextState[x][y] = 'wall';
+         break;
+     }
+   }
+ }
+
+ Waffle.state = nextState;
Save the game.js file and reload the index.html file in your browser, and you should see the level displayed!
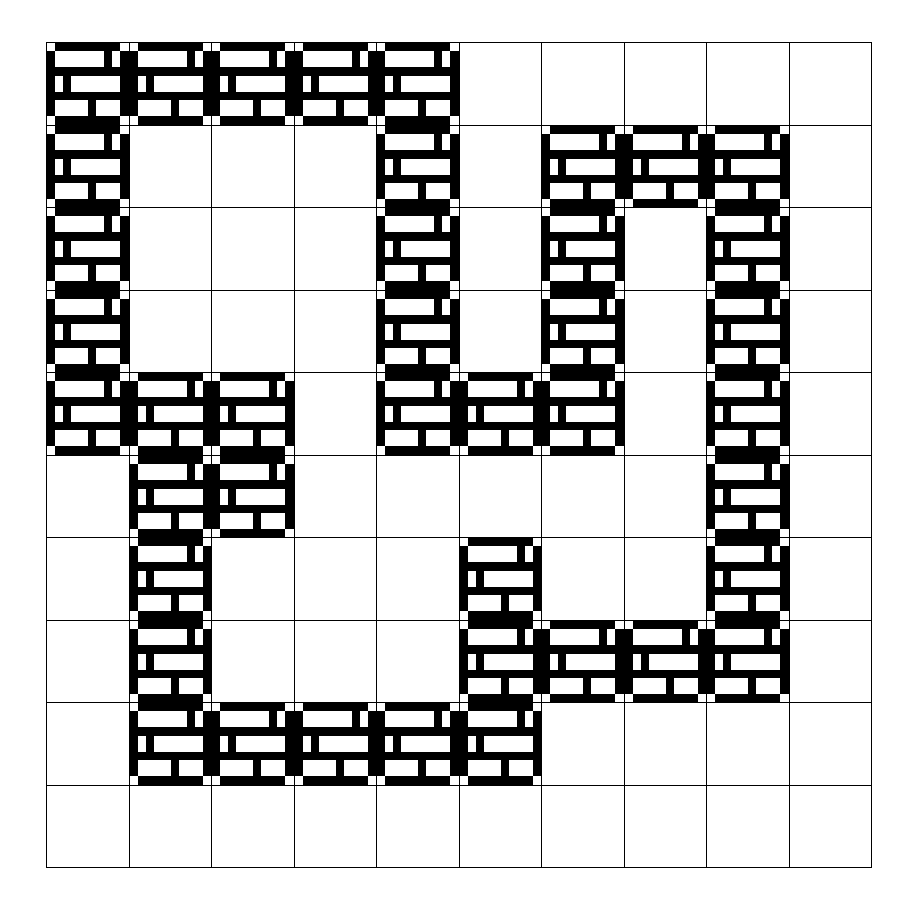
But wait… something’s not quite right. We were expecting the level to look the same as what we created in the code, but it looks like it’s been rotated 90 degrees and flipped vertically. The reason behind this is because of the way we represent 2D arrays in code. Looping over the array twice with x and y variables accesses them like this:
  [
    [x=0,y=0],[x=0,y=1],[x=0,y=2],[x=0,y=3],
    [x=1,y=0],[x=1,y=1],[x=1,y=2],[x=1,y=3],
    [x=2,y=0],[x=2,y=1],[x=2,y=2],[x=2,y=3],
    [x=3,y=0],[x=3,y=1],[x=3,y=2],[x=3,y=3],
  ]
You can see that this loop inverts the (x, y) values. We can solve the problem by also inverting the way we use the x and y variables to access the level data.
for (let x = 0; x < Waffle.columns; x += 1) {
  for (let y = 0; y < Waffle.rows; y += 1) {

-   const cell = level[x][y];
+   // change the order of the array indexing
+   const cell = level[y][x];

    // evaluate the simplifed text contents of the
    // level data and set the state of the grid
    switch (cell) {
      case '#':
        nextState[x][y] = 'wall';
        break;
  }
}
Waffle uses a similar solution when mapping its state variable to the HTML on the page, so that we can use x and y to access grid values in the normal way.
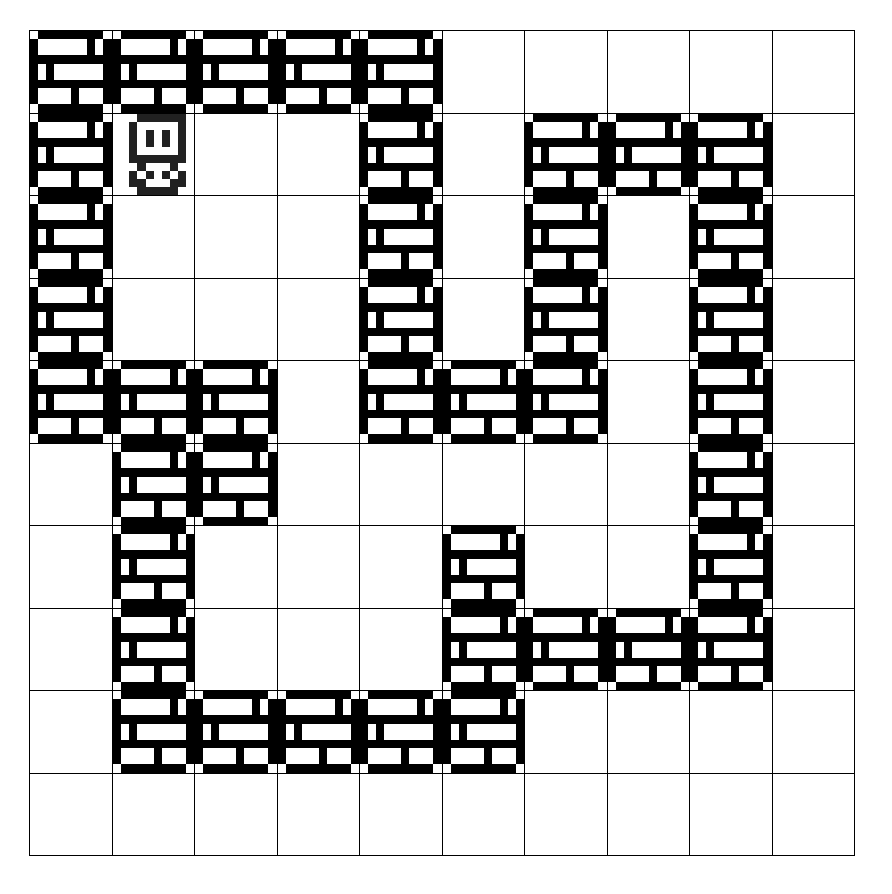
The next thing we can add is the player. We’ll take a page out of roguelike games and use @ to represent the player’s starting location in the level.
const level = [
  ['#','#','#','#','#',' ',' ',' ',' ',' '],
+ ['#','@',' ',' ','#',' ','#','#','#',' '],
  ['#',' ',' ',' ','#',' ','#',' ','#',' '],
  ['#',' ',' ',' ','#',' ','#',' ','#',' '],
  ['#','#','#',' ','#','#','#',' ','#',' '],
  [' ','#','#',' ',' ',' ',' ',' ','#',' '],
  [' ','#',' ',' ',' ','#',' ',' ','#',' '],
  [' ','#',' ',' ',' ','#','#','#','#',' '],
  [' ','#','#','#','#','#',' ',' ',' ',' '],
  [' ',' ',' ',' ',' ',' ',' ',' ',' ',' '],
];
Now we need to handle the @ value in the code that parses the level. We’ll also create a new variable, player, that is a reference to the player’s current position. It would be tedious if every time we wanted to move the player, we had to search the entire grid to find the cell that contained the 'player' value.
+ const player = {x: 0, y: 0};
+
for (let y = 0; y < Waffle.rows; y += 1) {
  for (let x = 0; x < Waffle.columns; x += 1) {
    const cell = level[x][y];

    // evaluate the simplifed text contents of the
    // level data and set the state of the grid
    switch (cell) {
      case '#':
        nextState[x][y] = 'wall';
        break;
+     case '@':
+       nextState[x][y] = 'player';
+       player.x = x;
+       player.y = y;
+       break;
  }
}
Of course this means we also need to create a CSS rule to display the “player” graphic.
#grid {
  /* omitted for brevity */

  .wall {
    background: url('images/wall.png') center/100%;
  }
+ .player {
+   background: url('images/player.png') center/100%;
+ }
}
Reload, and the player should appear in the level.
Now we need to move the player around. To that end, we’ll add some code to the Waffle.onKeyDown callback function that’s already in game.js. Normally when updating a player object, we’d just directly change its (x, y) position. But since I can see the future, and know a little more about the functionality we have to write next, we’re going to start off making things slightly more complicated. The reason for this is that we need to take box-pushing into account. If the player moves into a box, we want to move the box to the next open space. But in order to do that, we need to know the direction the player is moving; e.g. it’s easier to add a {x: 0, y: 1} value to both the player and the box, rather than have to determine that same value after each movement by subtracting the player’s new position from the old.
Waffle.onKeyDown(({ key }) => {
- console.log(`pressed ${key}`);
+ const move = {x: 0, y: 0};
+
+ switch (key) {
+   case 'w':
+     move.y -= 1;
+     break;
+   case 's':
+     move.y += 1;
+     break;
+   case 'a':
+     move.x -= 1;
+     break;
+   case 'd':
+     move.x += 1;
+     break;
+ }
+
+ const playerNext = {
+   x: player.x + move.x,
+   y: player.y + move.y
+ };
+
+ const state = Waffle.state;
+
+ // remove from the old position
+ state[player.x][player.y] = '';
+
+ // update position data
+ player.x = playerNext.x;
+ player.y = playerNext.y;
+
+ // put player in new position
+ state[player.x][player.y] = 'player';
+
+ // update the game
+ Waffle.state = state;
});
You can see here that we take keyboard input from w, a, s, d and determine a move vector based on that. Then we can calculate the player’s next position, and update the display.
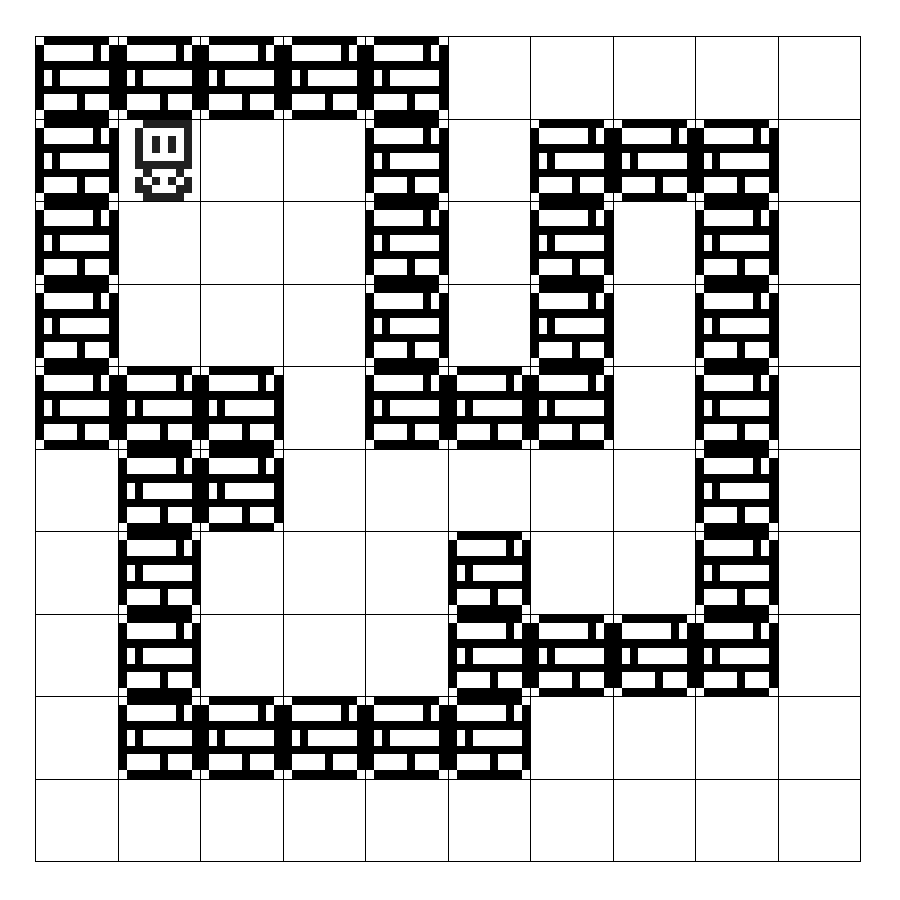
You’ll notice, of course, that the player can move through walls, destroying them at the same time. Before blindly moving the player, we can check to see if the destination contains a wall. Let’s add a condition to check if the new position already had an object in it using Waffle.isEmpty.
const state = Waffle.state;

+ if (Waffle.isEmpty(state[playerNext.x][playerNext.y])) {
    // remove from the old position
    state[player.x][player.y] = '';

    // update position data
    player.x = playerNext.x;
    player.y = playerNext.y;

    // put player in new position
    state[player.x][player.y] = 'player';
+ }

// update the game
Waffle.state = state;
Save the source file, reload the page, and voilà! Now the player is blocked by walls, as we would expect.
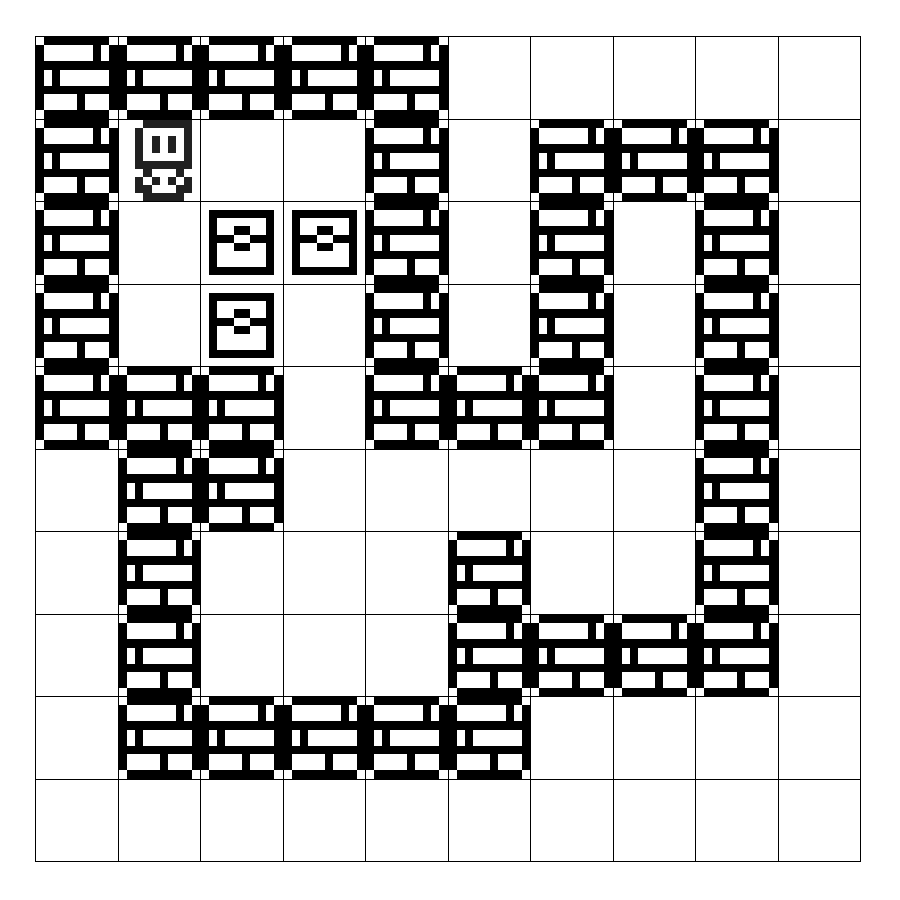
Next, let’s add boxes! Hoo boy, things are getting exciting now! Use B to represent a Box. We’ll create three of them in this level.
const level = [
  ['#','#','#','#','#',' ',' ',' ',' ',' '],
  ['#','@',' ',' ','#',' ','#','#','#',' '],
  ['#',' ',' ',' ','#',' ','#',' ','#',' '],
+ ['#',' ','B','B','#',' ','#',' ','#',' '],
+ ['#',' ','B',' ','#',' ','#',' ','#',' '],
  ['#','#','#',' ','#','#','#',' ','#',' '],
  [' ','#','#',' ',' ',' ',' ',' ','#',' '],
  [' ','#',' ',' ',' ','#',' ',' ','#',' '],
  [' ','#',' ',' ',' ','#','#','#','#',' '],
  [' ','#','#','#','#','#',' ',' ',' ',' '],
  [' ',' ',' ',' ',' ',' ',' ',' ',' ',' '],
];
Update the level parsing code to recognize the B character as a box.
for (let y = 0; y < Waffle.rows; y += 1) {
  for (let x = 0; x < Waffle.columns; x += 1) {
    const cell = level[x][y];

    // evaluate the simplifed text contents of the
    // level data and set the state of the grid
    switch (cell) {
      case '#':
        nextState[x][y] = 'wall';
        break;
      case '@':
        nextState[x][y] = 'player';
        player.x = x;
        player.y = y;
        break;
+     case 'B':
+       nextState[x][y] = 'box';
+       break;
  }
}
And we need to add the associated CSS class.
#grid {
  /* omitted for brevity */

  .wall {
    background: url('images/wall.png') center/100%;
  }
  .player {
    background: url('images/player.png') center/100%;
  }
+ .box {
+   background: url('images/box.png') center/100%;
+ }
}
Save and reload to see boxes! Not bad. You’ll notice that at this point, boxes behave like walls. This is because our collision detection code just checks for the presence of anything in the target cell. We can update the logic to distinguish between walls and boxes.
const state = Waffle.state;

if (Waffle.isEmpty(state[playerNext.x][playerNext.y])) {
  // remove from the old position
  state[player.x][player.y] = '';

  // update position data
  player.x = playerNext.x;
  player.y = playerNext.y;

  // put player in new position
  state[player.x][player.y] = 'player';
+ } else if (state[playerNext.x][playerNext.y] === 'box') {
+ // determine the box's next position
+ const boxNext = {
+   x: playerNext.x + move.x,
+   y: playerNext.y + move.y
+ };
+
+ // is next position for the box open?
+ if (Waffle.isEmpty(state[boxNext.x][boxNext.y])) {
+   // move the box
+   state[boxNext.x][boxNext.y] = 'box';
+
+   // move the player (same as above)
+   // the player will overwrite the box's previous position
+   state[player.x][player.y] = '';
+
+   player.x = playerNext.x;
+   player.y = playerNext.y;
+
+   state[player.x][player.y] = 'player';
+ } else {
+   console.log(`Can't move box; blocked by ${state[boxNext.x][boxNext.y]}`);
+ }
}

// update the game
Waffle.state = state;
Awesome, the player can now push boxes around! If you open the browser’s development console, you can also see a message printed if the box is blocked by a wall or another box.
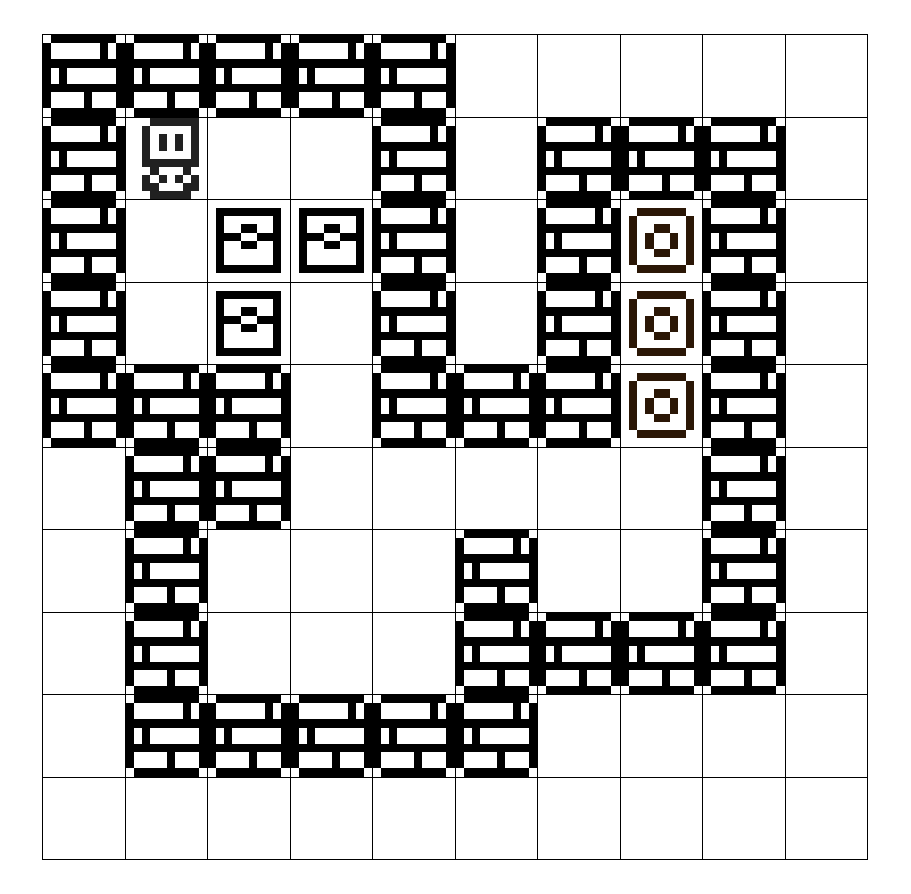
Now that boxes can be moved, we need to add targets — the raison d’être for this game. Once all the targets have boxes on them, the level is completed. In a stoke of genius, we’ll use the character T to represent a target in the level data.
const level = [
  ['#','#','#','#','#',' ',' ',' ',' ',' '],
  ['#','@',' ',' ','#',' ','#','#','#',' '],
+ ['#',' ',' ',' ','#',' ','#','T','#',' '],
+ ['#',' ','B','B','#',' ','#','T','#',' '],
+ ['#',' ','B',' ','#',' ','#','T','#',' '],
  ['#','#','#',' ','#','#','#',' ','#',' '],
  [' ','#','#',' ',' ',' ',' ',' ','#',' '],
  [' ','#',' ',' ',' ','#',' ',' ','#',' '],
  [' ','#',' ',' ',' ','#','#','#','#',' '],
  [' ','#','#','#','#','#',' ',' ',' ',' '],
  [' ',' ',' ',' ',' ',' ',' ',' ',' ',' '],
];
Update the level parsing code block:
switch (cell) {
  case '#':
    nextState[x][y] = 'wall';
    break;
  case '@':
    nextState[x][y] = 'player';
    player.x = x;
    player.y = y;
    break;
  case 'B':
    nextState[x][y] = 'box';
    break;
+ case 'T':
+   nextState[x][y] = 'target';
+   break;
}
And add the CSS class to main.css:
#grid {
  /* omitted for brevity */

  .wall {
    background: url('images/wall.png') center/100%;
  }
  .player {
    background: url('images/player.png') center/100%;
  }
  .box {
    background: url('images/box.png') center/100%;
  }
+ .target {
+   background: url('images/target.png') center/100%;
+ }
}
The targets are now displayed in the level, but they behave in the same way as a wall — when the player tries to move on to them, the game checks if the space is empty, and since it’s not, prevents movement. I’d expect these targets to behave in a similar way to empty spaces — we should be able to move over them, as well as push boxes on top of them. In order to do that, update the collision detection code to allow movement over empty cells and targets.
+ if (Waffle.isEmpty(state[playerNext.x][playerNext.y]) || state[playerNext.x][playerNext.y] === 'target') {
  // player movement code here
} else if (state[playerNext.x][playerNext.y] === 'box') {
  // determine the box's next position
  const boxNext = {
    x: playerNext.x + move.x,
    y: playerNext.y + move.y
  };

  // is next position for the box open?
+ if (Waffle.isEmpty(state[boxNext.x][boxNext.y]) || state[boxNext.x][boxNext.y] === 'target') {
    // move the box
    state[boxNext.x][boxNext.y] = 'box';

    // player movement code here
This is starting to get a little verbose — those conditional lines are pretty long — so we can extract a helper function to simplify things. Add this function to the end of game.js.
const canMoveTo = (point) => {
  const state = Waffle.state;

  return Waffle.isEmpty(state[point.x][point.y]) || state[point.x][point.y] === 'target';
};
And replace the super long conditional statements like so:
+ if (canMoveTo(playerNext)) {
  // player movement code here
} else if (state[playerNext.x][playerNext.y] === 'box') {
  // determine the box's next position
  const boxNext = {
    x: playerNext.x + move.x,
    y: playerNext.y + move.y
  };

  // is next position for the box open?
+ if (canMoveTo(boxNext)) {
    // move the box
    state[boxNext.x][boxNext.y] = 'box';

    // player movement code here

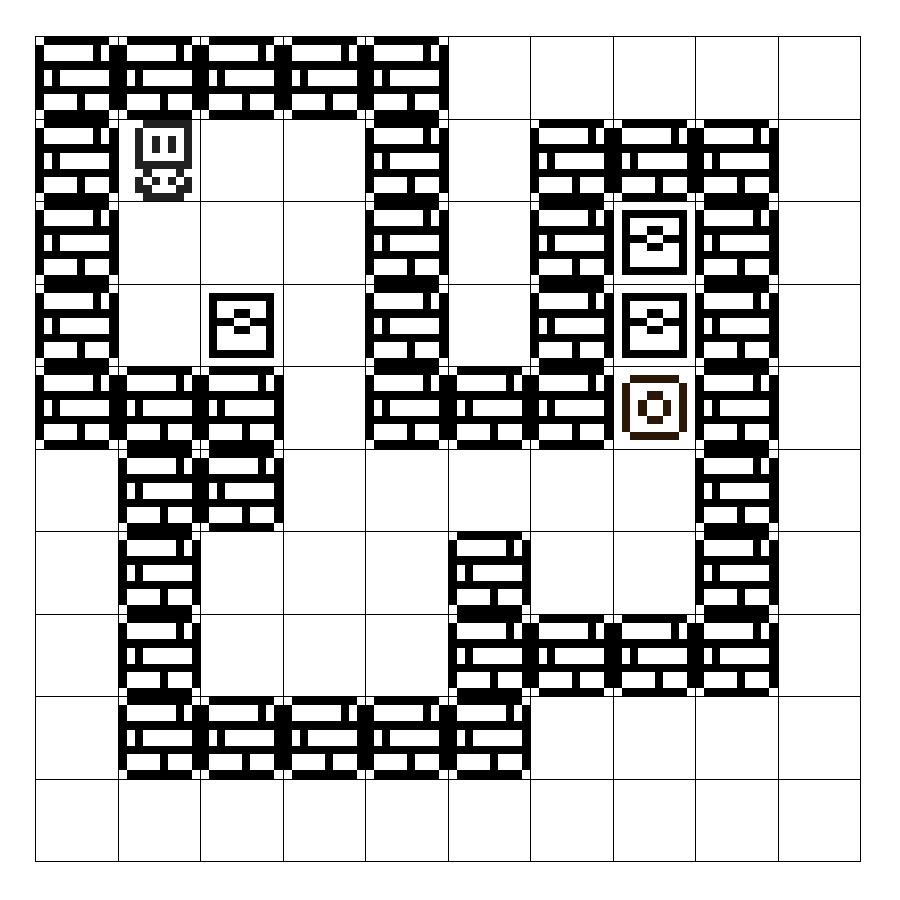
This now lets the player move over targets, as well as move boxes over them. There’s a new problem now, though — once you move over a target, then move off it, it disappears! This is because the player object overwrites the target in the game state. Waffle is so simple that it doesn’t have a way to persist overlapping objects. The moving object overwrites whatever was there previously. In Sokoban, this is a problem because both the player and boxes can move over top of box targets, which need to re-appear if the player or box moves back off again. To fix this, we can to store the location of targets in a separate data structure instead of just in Waffle.state.
Add a new array named targets next to the player variable:
const player = {x: 0, y: 0};
+ const targets = [];
Then we can add each target to that list:
switch (cell) {
  case '#':
    nextState[x][y] = 'wall';
    break;
  case '@':
    nextState[x][y] = 'player';
    player.x = x;
    player.y = y;
    break;
  case 'B':
    nextState[x][y] = 'box';
    break;
  case 'T':
    nextState[x][y] = 'target';
+   targets.push({x, y});
    break;
}
Then ensure that the targets are re-drawn if necessary, in Waffle.onKeyDown:
const state = Waffle.state;

/* movement code here */

+ // re-display targets if player/box moves off them
+ for (const t of targets) {
+   if (Waffle.isEmpty(state[t.x][t.y])) {
+     state[t.x][t.y] = 'target';
+   }
+ }

Waffle.state = state;
At this point, we’re very close to having all the features we need for the game to be playable. The player can move, can push boxes, and we have targets for each box. The last thing we need is for the game to check whether or not the level has been completed; e.g. a box on top of each target. Fortunately, since we had to store the position of each target in order to re-draw them, we can use that same variable to check to see if those spaces are covered by boxes.
const hasWonGame = () => {
  const state = Waffle.state;

  return targets.every(t => state[t.x][t.y] === 'box');
};
Add this function to game.js, and use it at the end of Waffle.onKeyDown like so:
for (const t of targets) {
  if (Waffle.isEmpty(state[t.x][t.y])) {
    state[t.x][t.y] = 'target';
  }
}

Waffle.state = state;

+ if (hasWonGame()) {
+  Waffle.alert('Congratulations!');
+ }
And there it is, a basic Sokoban game. Next steps might be to build a level editor, or you can stick with making levels by hand in your text editor. It’s relatively quick to build out the logic for these sorts of games; the time-consuming bit is creating interesting levels. Good luck!